Broadcast Engineer at BellMedia, Computer history buff, compulsive deprecated, disparate hardware hoarder, R/C, robots, arduino, RF, and everything in between.
5823 stories
·
5 followers

Bust Out That Old Analog Scope For Some Velociraster Fun!

1 Share

[Oli Wright] is back again with another installation of CRT shenanigans. This time, the target is the humble analog oscilloscope, specifically a Farnell DTV12-14 12 MHz dual-channel unit, which features a handy X-Y mode. The result is the Velociraster, a simple (in hardware terms) Raspberry Pi Pico based display driver.

Using a Pico to drive a pair of AD767 12-bit DACs, the outputs of which drive the two ‘scope input channels directly, this breadboard and pile-of-wires hack can produce some seriously impressive results. On the software side of things, the design is a now a familiar show, with core0 running the application’s high-level processing, and core1 acting in parallel as the rendering engine, determining static DAC codes to be pushed out to the DACs using the DMA and the PIO.

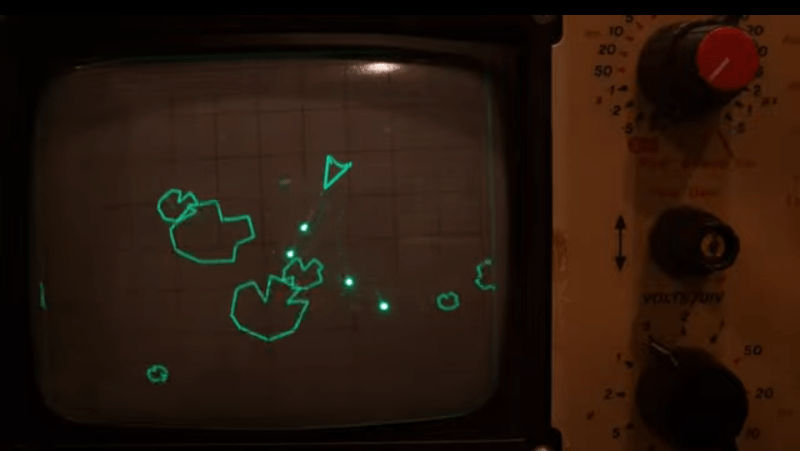
The first demo is in vector mode, simply showing some simple shapes, to get an idea of the accuracy and linearity 
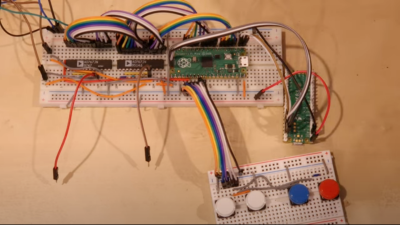
of the system. Next [Oli] shows a slick demo of a ‘starfield’ type effect, which renders different point brightnesses by accurately controlling the beam hold time. Next up is an  Asteroids-like game —which should be familiar to many — that shows off vector rendering with some nice particle effects visible due to the CRTs wide dynamic range.

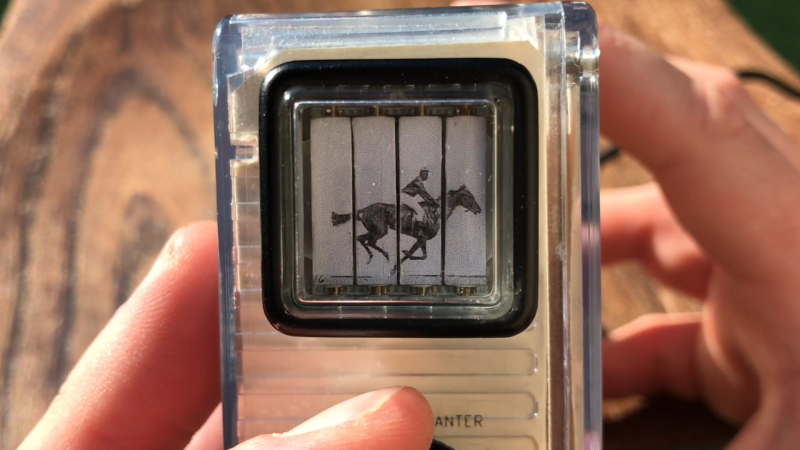
[Oli] then goes on to show off raster mode, with an accurate-looking space invaders clone, followed by a static image showing some rudimentary grey-scale control mixed in with vector-mode graphics! There is an extra-special treat at the end of the video, which you’re not going to want to miss. No spoilers!

Some example code can be found in the examples repo, with the rendering library available here, for those who wish to play along at home.

Obviously driving a scope in XY mode with a computer is not a new trick, we’ve seen someone drive a (digital) Rigol to that effect, but CRTs just look, you know, cooler.

Read the whole story
tekvax
364 days ago
reply
Burlington, Ontario
Share this story
Delete

IBM Selectric Typewriters Finally Get DIY Typeballs

1 Comment and 2 Shares

IBM’s Selectric line of typewriters were quite popular in the 1960s, thanks in part to an innovation called the typeball which allowed for easy font changes on a single machine. Unfortunately, as if often the case when specialized components are involved, it’s an idea that hasn’t aged particularly well. The Selectric typewriters are now around 60 years old and since IBM isn’t making replacement parts, those restoring these machines have had to get somewhat creative like using a 3D printer to build new typeballs.

It sounds like it would be a simple, but much like the frustration caused with modern printers, interfacing automated computer systems with real-world objects like paper and ink is not often as straightforward as we would like. The main problem is getting sharp edges on the printed characters which is easy enough with metal but takes some more finesse with a printed plastic surface. For the print, each character is modelled in OpenSCAD and then an automated process generates the 3D support structure that connects the character to the typeball.

This process was easier for certain characters but got more complicated for characters with interior sections or which had a lot of sharp angles and corners. Testing the new part shows promise, although the plastic components will likely not last as long as their metal counterparts. Still, it’s better than nothing.

Regular Hackaday readers may recall that the ability to 3D print replacement Selectric typeballs has been on the community’s mind for years. When we last covered the concept in 2020 we reasoned that producing them on resin printers might be a viable option, and in the end, that does indeed seem to have been the missing element. In fact, this design is based on that same one we covered previously — it’s just taken this long for desktop resin 3D printing technology to mature enough.

Read the whole story
tekvax
371 days ago
reply
Comic Sans?
Burlington, Ontario
Share this story
Delete

Busting Wireless ESD Wrist Straps With LTT and ElectroBOOM

1 Share

Nobody likes getting zapped from an electrostatic discharge, no matter whether you’re a fragile ASIC or a bag-of-mostly-salty-water humanoid. To prevent this, ESD wrist straps and similar are essential tools, as they prevent the build-up of a charge on your humanoid’s skin, essentially like a very large electrolyte-filled capacitor. Yet you can buy wireless ESD straps everywhere that are supposed to somehow dissipate this charge into the ether, even though this would seem to undermine the laws of physics that make capacitors work.

In a practical experimentation and assorted hijinks video collaboration by [Linus] from Linus Tech Tips and [Mehdi Sadaghdar] from ElectroBOOM put these wireless ESD straps to the test, featuring [Mehdi]’s DIY Van de Graaff generator to charge [Linus] up. What is excellently demonstrated in this video is how effective a real ESD strap is, and how the ‘wireless’ version is just a scam that does absolutely nothing to dissipate the charge, being just a waste of a 1 MOhm resistor and what could have been a real ESD strap.

Also covered in the video are what the reason for the resistor in an ESD strap is, and why metal bracelet type ESD straps are not appropriate, for very good reasons.

(Thanks to [hackbyte] for the tip)

Read the whole story
tekvax
371 days ago
reply
Burlington, Ontario
Share this story
Delete

ISD1700 Based Lo-Fi Sampler

1 Share

Custom music instruments here at Hackaday range from wacky to poignant. OpnBeat by [Hiro Akihabara] focuses on something different: simplicity.

There are few buttons, the design and code are optimized to be straightforward and easy to modify, and the interface is slick. Eight musical keys complement three interface keys and a knob. An Arduino Nano powers the main brains of the system but the music generation comes from eight Nuvoton ISD1700s controlled over SPI by the Nano. The beautifully laid-out PCB is 110mm by 180mm (4.33″ by 7″), so cases can easily be printed on smaller FDM printers. All the switches are Cherry MX switches for the beautiful tactile feedback.

The code, PCB, and 3D case files are all available on GitHub. We love the thought that went into the design and the focus on making it easy to recreate. It might be quite as cute and simplified as this twelve-button musical macro pad, but the two together could make quite the band.

Read the whole story
tekvax
371 days ago
reply
Burlington, Ontario
Share this story
Delete

Pi Microcontroller Still Runs a Webserver

1 Share

At first glance, the Raspberry Pi Pico might seem like a bit of a black sheep when compared to the other offerings from the Raspberry Pi Foundation. While most of the rest of their lineup can run Linux environments with full desktops, the Pico is largely limited to microcontroller duties in exchange for much smaller price tags and footprints. But that doesn’t mean it can’t be coerced into doing some of the things we might want a mainline Pi to do, like run a web server.

The project can run a static web page simply by providing the Pico with the project code available on the GitHub page and the HTML that you’d like the Pico to serve. It can be more than a static web page though, as it is also capable of running Python commands through the web interface as well. The server can pass commands from the web server and back as well, allowing for control of various projects though a browser interface. In theory this could be much simpler than building a physical user interface for a project instead by offloading all of this control onto the web server instead.

The project not only supports the RP2040-based Raspberry Pi Pico but can also be implemented on other WiFi-enabled microcontroller boards like the ESP8266 and ESP32. Having something like this on hand could greatly streamline smaller projects without having to reach for a more powerful (and more expensive) single-board computer like a Pi 3 or 4. We’ve seen some other builds on these boards capable of not only running HTML and CSS renderers, but supporting some image formats as well.

Read the whole story
tekvax
372 days ago
reply
Burlington, Ontario
Share this story
Delete

Mechanical GIF Animates with the Power of Magnets

1 Share

It doesn’t matter how you pronounce it, because whichever way you choose to say “GIF” is guaranteed to cheese off about half the people listening. Such is the state of our polarized world, we suppose, but there’s one thing we all can agree on — that a mechanical GIF is a pretty cool thing.

What’s even better about this thing is that [Mitch], aka [Hack Modular], put some very interesting old aircraft hardware to use to make it. He came upon a set of cockpit indicators from a Cold War-era RAF airplane — sorry, “aeroplane” — that used a magnetically driven rack and pinion to swivel a set of prism-shaped pieces to one of three positions. Which of the three symbols displayed depended on which faces were turned toward the pilot; they were highly visible displays that were also satisfyingly clicky.

After a teardown in which [Mitch] briefly discusses the mechanism behind these displays, he set about customizing the graphics. Rather than the boring RAF defaults, he chose three frames from the famous Horse in Motion proto-motion picture by [Eadweard Muybridge]. After attaching vertical strips from each frame to the three sides of each prism, [Mitch] came up with a driver for the display; he could have used a 555, but more fittingly chose series-connected relays to do the job. Capacitors slow down the switching cascade and the frame rate; a rotary switch selects different caps to make the horse appear to be walking, trotting, cantering, or galloping — yes, we know they’re each physically distinct motions, but work with us here.

The whole thing looks — and sounds — great mounted in a nice plastic enclosure. The video below shows it in action, and we find it pretty amazing the amount of information that can be conveyed with just three frames. And we’re surprised we’ve never seen these displays before; they seem like something [Fran Blanche] or [Curious Marc] would love.

Read the whole story
tekvax
372 days ago
reply
Burlington, Ontario
Share this story
Delete
Next Page of Stories